18. Build KVM Host
This page is based on the following OpenStack Installation Guide pages:
http://docs.openstack.org/liberty/install-guide-rdo/environment-networking-compute.html
http://docs.openstack.org/liberty/install-guide-rdo/environment-ntp-other.html
http://docs.openstack.org/liberty/install-guide-rdo/environment-packages.html
- In this guide I am using a server with a small RAID-1 for the OS, and a large RAID-10 for the VMs. There are four network interfaces, although only the first two are in use.
- Boot the KVM host with the CentOS 7.2.1511 DVD.
- Set your time zone and language.
- For “Software Selection”, set this to “Infrastructure Server”.
- Keep automatic partitioning. Allow to install only on first disk.
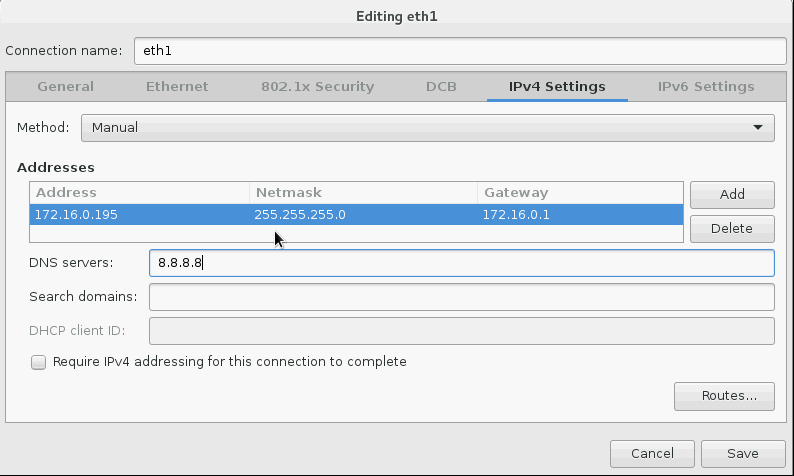
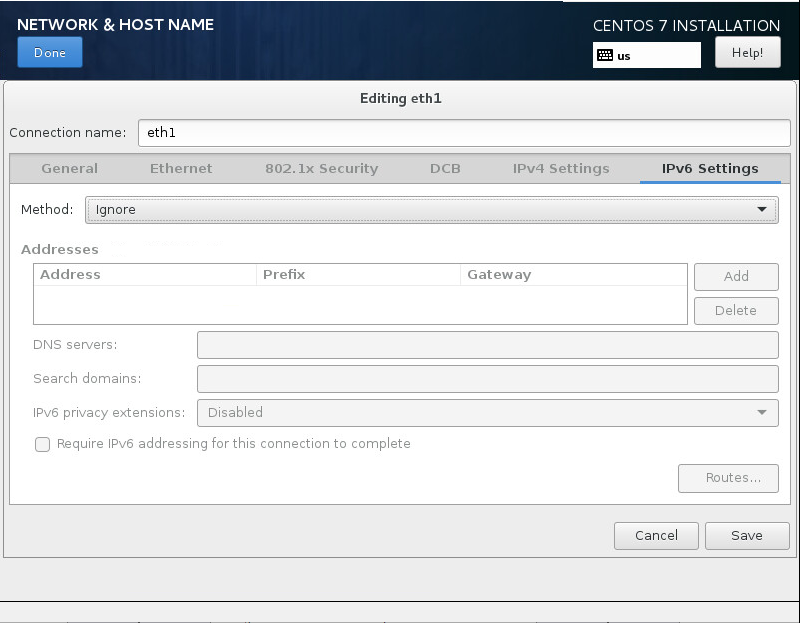
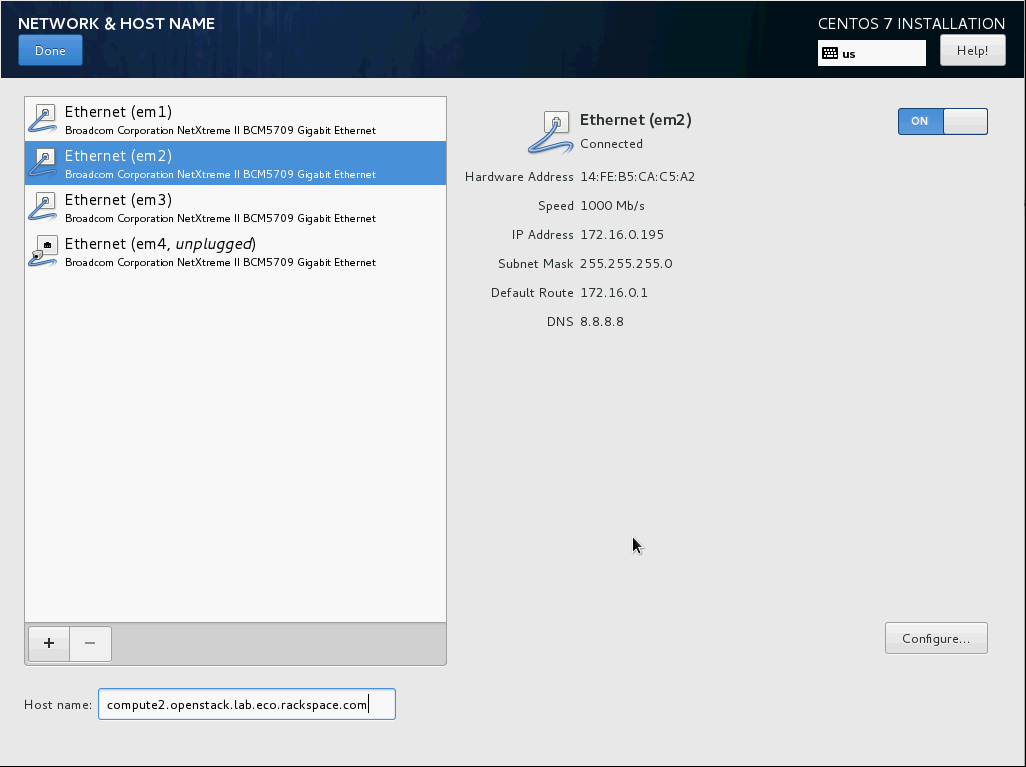
- Set the node’s IPv4 address on the management network interface and disable IPv6. Give the connection the name “eth1”. Set the node’s hostname:
Click on “Begin Installation”.
Set a good root password.
Once installation is complete, reboot the server, and remove the DVD/ISO from the server.
SSH in to server as root.
Stop and disable the firewalld service:
# systemctl disable firewalld.service
# systemctl stop firewalld.service
Disable SELINUX:
# setenforce 0
# vim /etc/sysconfig/selinux

  SELINUX=permissive
Update all packages on the server:
# yum update
We need persistent network interface names, so we’ll configure udev to give us these. Replace
00:00:00:00:00:00with the MAC addresses of your KVM node:# vim /etc/udev/rules.d/90-persistent-net.rules SUBSYSTEM=="net", ACTION=="add", DRIVERS=="?*",ATTR{address}=="00:00:00:00:00:00",ATTR{dev_id}=="0x0", ATTR{type}=="1",KERNEL=="em*", NAME="eth0" SUBSYSTEM=="net", ACTION=="add", DRIVERS=="?*",ATTR{address}=="00:00:00:00:00:00",ATTR{dev_id}=="0x0", ATTR{type}=="1",KERNEL=="em*", NAME="eth1" SUBSYSTEM=="net", ACTION=="add", DRIVERS=="?*",ATTR{address}=="00:00:00:00:00:00",ATTR{dev_id}=="0x0", ATTR{type}=="1",KERNEL=="em*", NAME="eth2" SUBSYSTEM=="net", ACTION=="add", DRIVERS=="?*",ATTR{address}=="00:00:00:00:00:00",ATTR{dev_id}=="0x0", ATTR{type}=="1",KERNEL=="em*", NAME="eth3"
- Note: This file is case-sensitive, and the MAC addresses should be lower-case.
Rename the network interface configuration files to eth0 and eth1. Replace
em1,em2,em3andem4with the names of your KVM node’s interfaces:# cd /etc/sysconfig/network-scripts # mv ifcfg-em1 ifcfg-eth0 # mv ifcfg-em2 ifcfg-eth1 # mv ifcfg-em3 ifcfg-eth2 # mv ifcfg-em4 ifcfg-eth3
Modify the interface configuration files, replacing any instances of
em1,em2,em3,em4(or whatever your interface names are) witheth0,eth1,eth2andeth3respectively:# vim ifcfg-eth0 NAME=eth0 DEVICE=eth0 # vim ifcfg-eth1 NAME=eth1 DEVICE=eth1 # vim ifcfg-eth2 NAME=eth2 DEVICE=eth2 # vim ifcfg-eth3 NAME=eth3 DEVICE=eth3
Reboot the KVM node:
# systemctl reboot
SSH back in as root after the reboot.
Check that ifconfig now shows
eth0,eth1,eth2andeth3:# ifconfig eth0: flags=4163<UP,BROADCAST,RUNNING,MULTICAST> mtu 1500 ether 14:fe:b5:ca:c5:a0 txqueuelen 1000 (Ethernet) RX packets 1195904 bytes 1012346616 (965.4 MiB) RX errors 0 dropped 0 overruns 0 frame 0 TX packets 366843 bytes 28571196 (27.2 MiB) TX errors 0 dropped 0 overruns 0 carrier 0 collisions 0 eth1: flags=4163<UP,BROADCAST,RUNNING,MULTICAST> mtu 1500 inet 172.16.0.195 netmask 255.255.255.0 broadcast 172.16.0.255 inet6 fe80::16fe:b5ff:feca:c5a2 prefixlen 64 scopeid 0x20<link> ether 14:fe:b5:ca:c5:a2 txqueuelen 1000 (Ethernet) RX packets 12004890 bytes 15236092868 (14.1 GiB) RX errors 0 dropped 156 overruns 0 frame 0 TX packets 12647929 bytes 15934829339 (14.8 GiB) TX errors 0 dropped 0 overruns 0 carrier 0 collisions 0 eth2: flags=4163<UP,BROADCAST,RUNNING,MULTICAST> mtu 1500 ether 14:fe:b5:ca:c5:a4 txqueuelen 1000 (Ethernet) RX packets 1985034 bytes 180158767 (171.8 MiB) RX errors 0 dropped 252 overruns 0 frame 0 TX packets 0 bytes 0 (0.0 B) TX errors 0 dropped 0 overruns 0 carrier 0 collisions 0 eth3: flags=4099<UP,BROADCAST,MULTICAST> mtu 1500 ether 14:fe:b5:ca:c5:a6 txqueuelen 1000 (Ethernet) RX packets 0 bytes 0 (0.0 B) RX errors 0 dropped 0 overruns 0 frame 0 TX packets 0 bytes 0 (0.0 B) TX errors 0 dropped 0 overruns 0 carrier 0 collisions 0 lo: flags=73<UP,LOOPBACK,RUNNING> mtu 65536 inet 127.0.0.1 netmask 255.0.0.0 inet6 ::1 prefixlen 128 scopeid 0x10<host> loop txqueuelen 0 (Local Loopback) RX packets 9855259 bytes 517557258 (493.5 MiB) RX errors 0 dropped 0 overruns 0 frame 0 TX packets 9855259 bytes 517557258 (493.5 MiB) TX errors 0 dropped 0 overruns 0 carrier 0 collisions 0Update the system hosts file with entries for all nodes:
# vim /etc/hosts

172.16.0.192 controller controller.openstack.lab.eco.rackspace.com
172.16.0.203 compute1 compute1.openstack.lab.eco.rackspace.com
172.16.0.204 compute1-vm compute1-vm.openstack.lab.eco.rackspace.com
172.16.0.195 compute2 compute2.openstack.lab.eco.rackspace.com
172.16.0.196 block1 block1.openstack.lab.eco.rackspace.com
172.16.0.197 object1 object1.openstack.lab.eco.rackspace.com
172.16.0.198 object2 object2.openstack.lab.eco.rackspace.com
Update the chrony configuration to use the controller as a time source:
# vim /etc/chrony.conf

  server controller iburst
- Remove any other servers listed, leaving only “
controller”.
Restart the chrony service, and confirm that “
controller” is listed as a source:# systemctl restart chronyd.service # chronyc sources 210 Number of sources = 1 MS Name/IP address Stratum Poll Reach LastRx Last sample =============================================================================== ^* controller 3 6 17 6 -3374ns[+2000ns] +/- 6895us
Enable the OpenStack-Liberty yum repository:
# yum install centos-release-openstack-liberty
Install the OpenStack client and SELINUX support:
# yum install python-openstackclient openstack-selinux